Showing posts with label bathroom. Show all posts

Vintage Bathroom Makeover

We finally finished the mini bathroom makeover.  What we thought would be a weekend bathroom makeover at most turned into a two week headache of a project.  Our bathroom is a vintage original bathroom so we ran into a lot of problems.  Every single thing that could go wrong went totally wrong and when we thought nothing could get worse it did.  Our house became a complete mess as I tackled projects for hours everyday, it seemed like we were never going to finish.  But we are finally done and we couldn't be happier with our vintage bathroom makeover.  I'm going to spare all the before pictures since I already shared them in this post.  I will, however bombard you with tons of beautiful after pics!  Are you ready?

Vintage bathroom makeover green cabinet door black bamboo mirror

Vintage Bathroom Makeover green cabinets

 Let me just start with the to do list I wrote on the last post about the bathroom.

To do list
  • Sand cabinet doors and drawer fronts
  • Clean, de-dust, everything
  • Prime ceiling, caulk trim and piece of unfinished wall (I already patched it) then prime them
  • Prime cabinets and doors.  
  • Replace drop in sink and faucet
  • Glue fallen tiles and caulk between them and the heater.
  • Paint the cabinet in gorgeous green color, I'm so excited about adding color!!!!
  • Make holes for new cabinet hardware, I bought some really nice ones, I can't wait for that!
  • Shop for pretty shower curtain, and figure out window treatment.
  • Clean up the old light fixtures and vintage mirror, keeping those for now.  

Vintage Bathroom Makeover lace curtain

Vintage Bathroom Makeover green door

I primed and painted everything, inside and outside.  I painted the ceiling the same color as the walls for a nice seamless look.  The door to the mini closet also got painted in the same wall color.  I debated between doing the trim the same color too but ultimately ended with white trim.  The color on the walls is Irish Mist by Behr, the same as the kitchen and dining room.  The inside of the cabinets and closet are also white.
A few details about the closet door.  I removed the handle because the entry door knob would smack in to it and it was all beat up.  I bought a door stopper, a wall protector and a latch to keep it closed.


Vintage Bathroom Makeover green cabinets door

Vintage Bathroom Makeover green cabinets
The outside of the cabinets and the bathroom entry door is painted in Sherwin Williams Basil, I had the color matched to Behr's premium plus enamel in semi gloss.  I love this paint and the color is so lush.  I purchased new hardware and spray painted all the hinges to match.  I love, love, love the cabinets!  

Vintage Bathroom Makeover green vanity cabinet american standard faucet

Vintage Bathroom Makeover green cabinets new american standard faucet

Vintage Bathroom Makeover green cabinets goose neck american standard faucet

Vintage Bathroom Makeover green cabinets american standard faucet

We ended up purchasing a new faucet and sink because the craigslist ones didn't work.  The faucet was leaky and the sink bowl was oval instead of round and it didn't fit, it was too small.  This was the second set of sink and faucet we purchased.  The first sink was made from a material that felt too cheap so we returned it and bought a ceramic one.  The first faucet had a pop up drain and we just did not like that feature, we prefer the original drain.  Changing the faucet was the biggest headache of all.  The pipes were so corroded that they would deteriorate and fall apart just from touching them.  My husband went through so much work replacing all the pipes and it must have taken him like 8 or 9 trips back and forth to the hardware store to get everything right.  Every single thing we did took us multiple trips to the hardware store.  It was very frustrating.  The second time we went to exchange the faucet we came back home to a flooded basement and soaked bathroom.  We were starting to think this whole thing was a terrible idea.  But thankfully all of that is behind and we love our new faucet, It's a huge upgrade!  

Vintage Bathroom Makeover lace beaded curatainVintage Bathroom Makeover beaded lace curtain shower curtain

It is so hard for me to get a good picture of the new window curtain.  I'm so proud of myself for it, I totally DIY-ed the heck out of that baby.  I used a curtain I already had, and trimmed it to size, I bought a lace curtain at goodwill for a buck plus some beaded trim at Hobby Lobby.  The shower curtain is DKNY purchased from Marshalls.  It's so light and airy in a light beige see through fabric.    

Vintage Bathroom Makeover black bamboo mirror

Vintage Bathroom Makeover black bamboo mirror gold and black light fixture

Vintage Bathroom Makeover gold and black light fixture black bamboo mirror

Vintage Bathroom Makeover gold and black light fixture

I was going to keep the old mirror and light fixtures next to it but I could not resist trying something else.  First I purchased this mirror at Goodwill but ended up using another one I already had in the living room, I spray painted it gloss black, it looks amazing!  After I painted the mirror I couldn't help wanting to paint the light fixtures too.  I took them apart in to 9,000 pieces, cleaned them and painted them gold and black.  This was one of the smallest changes that made a huge difference.  When I went to install them back up the circuit breaker kept tripping, it took me about 5 to 6 continuous hours to get them back up.  We were already contemplating buying new ones because we thought they didn't work anymore.  I really didn't want to replace them because I loved how they turned out so much.  Plus we don't have any outlet plugs in the bathroom so it's nice that they have some on them.  Painting them was the best decision I made for them.  

Vintage Bathroom Makeover gold black light fixture bamboo mirror painting plants

Vintage Bathroom Makeover green cabinet Nate Berkus rug bath mat

Vintage Bathroom Makeover green cabinets

I purchased some other accessories such as the green ceramic planter, rug, wicker waste basket, acacia wood pump and the art print.  The planter was from Marshalls, I already had the plant, the rug is Nate Berkus from his Target line, the waste basket and soap pump is also from Target.  The print is from Etsy, I purchased a white mat for it and the bamboo frame I already had from a tag sale.  Everything else I already owned.

I still have to grout the tiles that I glued back on, this was another pain in the you know what.  It took two weeks and lots of headaches to finish the small vintage bathroom makeover, can you imagine how long it would take to do a full reno in here?  We are very happy with keeping the bathroom as is for a few years now!  I can't pick a favorite element out from this makeover, I really, truly love all the updates we did in here to make this bathroom more our style.  I love that it still feels vintage but it's definitely modernized and completely improved.  I also went above and beyond and organized all the drawers, cabinets and closet, more on that later.  I got a few compliments from guest and the biggest one is "OMG I can wash my hands in the bathroom now, you have a faucet!"  Funny fact, there was always a working faucet in here, people just didn't know how to open it, ha....

Linking up to


Mini Bathroom Makeover in the Making


Bathroom paint and knobs

Lately I've been very busy trying to fill up my online shop with new furniture pieces.  Working on furniture takes time, there are lots of steps involved.  Which means my house is being left in the back seat for a long time.  Last week I decided to take a break from painting furniture pieces to give my house a deep clean.  Wow did it need it!  I found our dining table hiding underneath paint cans and painting supplies.  We also had some impromptu house guest (perfect timing, feuf...)  The house is clean, the plants are happy and we were able to eat at the dining table a few times.  I say were because it only lasted that way a few days.  I got the sudden urge to spruce up the bathroom, so all of the bathroom stuff landed on our clean dining room table :-D  A clean dining table is always short lived here.


We can't afford a full reno in the bathroom yet.  It needs it but it is not in our priority list.  We saved up to put in new windows and a privacy fence in the side of the yard and those things were thankfully checked off our list this year.  The windows make such a big difference in our heating and cooling bills so we are very happy with them and they make our curb appeal look much better too.  See pictures here.  So does the fence.  Anyhow enough about that and back to the bathroom.

Before when we bought the house

I wanted to paint the sink cabinet, change out the old sink and faucet with a free one we got off good ole Craigslist .  We have beige fixtures in the bathroom, before we moved in one of the first things we did was to replace the beige toilet with a new water saving, white, elongated toilet.  We also painted the over the dark blue walls with a light, bright color called Irish mist.  The drop in sink and bathtub are still beige.  We are not switching the bathtub for now, that will be later with the full reno.  I also wanted to paint the doors, trim and finish the walls which we never did because they needed patching.  Simple right?
** Update- Free sink and faucet from Craigslist didn't work we had to purchase both pieces new!!!**

Before when we bought the house

New elongated, water, saving toilet (notice the green heater)

No, things are never as simple as I think they will be.  I started prepping the sink cabinet for paint and I called my husband and pointed out the fact that the baseboard heater is green and rusted.  I thought about painting it, but it would be messy.  I had to sand off the rust, prime with stop rust primer and then paint.  He said we should switch the cover out. I looked online and found some plastic covers you place on top but the reviews didn't convince me.  Plus the thought of putting something over them to hide the ugly doesn't help me because I know the ugly, rusted, dirty one is still under, and I wouldn't be able to sleep at night just thinking about it.  So we decided to just replace it with a new one.  The video on this old house made it look sooooo easy.  Long story short it wasn't as easy as we thought it would be but after much sweat,  a lot of cursing, fallen tiles and a few hours (yes hours) we got it done!

Before, nasty, green, rusted heater
Replace baseboard heater cover
After, pain the @$$ to install clean, new heater!
Replace baseboard heater cover
Full view!

We do not want to replace the tiles right now so we were lucky only one broke a little bit in the corner so I will be gluing them all back for now until we can afford a full renovation.  Replacing the heater set us back a day.  Next we wanted to replace the sink.  Well, it looks like that faucet has never once been shut off in it's entire life and the water shut off valve is stuck.  So back to home depot for more supplies.  New hoses, new shut off valves and drain pipe.  We got home, and realized we bought the wrong hoses, it was too late so we have to wait until later today to exchange them.

So in the middle of all this chaos, I decided it would be a good time to paint the ceiling, because you know all the other accumulated projects on the list wast enough.  Hubby took off the ugly light fixture so I could begin and it turns out we didn't have any rollers, like I though we did.  So nothing else got done.  Turns out we were very unprepared.  So I'm making a list, checking it twice (in my Santa Claus is coming to town singing voice).

So here we go....

List of things to buy
  • Rollers
  • Exchange hoses 
  • Paint trays
  • Liquid nails for the tiles
  • Toothpaste for brushing teeth :-D  
To do list
  • Sand cabinet doors and drawer fronts
  • Clean, de-dust, everything
  • Prime ceiling, caulk trim and piece of unfinished wall (I already patched it) then prime them
  • Prime cabinets and doors.  
  • Replace drop in sink and faucet
  • Glue fallen tiles and caulk between them and the heater.
  • Paint the cabinet in gorgeous green color, I'm so excited about adding color!!!!
  • Make holes for new cabinet hardware, I bought some really nice ones, I can't wait for that!
  • Shop for pretty shower curtain, and figure out window treatment.
  • Clean up the old light fixtures and vintage mirror, keeping those for now.  


It looks like we have our work cut out for us.  Now of to Home Depot.

Yes this post is full of ugly pictures but I'm hoping my next post will be full of gorgeous, after pictures!  So make sure to come back for the reveal!

If you want to see a mini, budget friendly, kitchen makeover see this post here!        


Clearance Junkie

This post is brought to you by my dearly beloved husband, who called me a "Clearance Junkie" when I got home from Target with a couple of clearance home decor items. As soon as they announced Nate Berkus Fall line was about to hit the stores I ran to see what was left of the Spring collection.  I have been swooning over the shallow white with gold faceted bowl but I didn't have any luck finding it at my nearest target and they don't sell it online anymore :'-(

Target - Nate Berkus Faceted Gold Detail Bowl:
Nate Berkus Gold Detail Bowl

However I did find me these cute little guys for $2.38.  They are a set of snail place card holders.


And Nate's beautiful Ceramic Geo Box for $5.98.  This is another one of those items I was swooning over when it first came out. So I was happy to find it and for such a big discounted price.


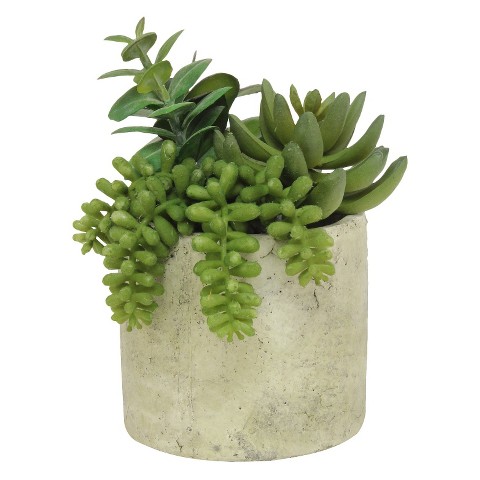
I also found this awesome Threshold mixed succulent potted arrangement for the tune of $6.98.  It is a concrete planter and the succulents are not real.
 *Disclaimer, ALL of my other house plants are REAL!!!  I don't like faux plants for my house but I made an exception for this one because it's a really good fake.   

Threshold Mixed Succulent Potted Arrangement

The snails are already hanging out with a couple of my house plants.  Looking good!  Whaaaat????  I know they are place card holders but I don't do place cards.  People sit wherever they want to sit when they come over for dinner. Yeah, I know, such disorderly conduct!!!!

Gold snail succulents

Gold snail succulents

Anyhow, they look so much cuter hanging out with my plants.  This way my plants and my snails each can keep each other company.  I also get to enjoy the little guys more often than only at dinner parties.  They are so freaking cute!  I love how the one with the white rocks looks.  I think I am going to add some white rocks to the other plant so the little snail could have some more contrast and really pop.  You don't have to limit yourself to using them as place card holders, when I saw them I immediately thought "plant buddies!"  You could prop these up on a wall shelf or on top of some books on a book shelf, whatever makes you happy. 

Gold snail succulents


For now I set the ceramic box on top of the bathroom counter.  I am not sure where it will end up or what it will hide but for now it's sitting there looking pretty.  Please don't hate on my fauxlicious marbled countertop or my vintage, retro, brown and speckled beige tile backsplash.  Yes that's an original ceramic, brown, yucky toothbrush holder sticking out of the wall. We even have a matching soap dish on the other side and matching bathroom tissue paper holder thing.  Yup, It's in dire need of a makeover, but it is in very good condition and it will have to wait until we can save our pennies for a complete gut renovation.  Which wont be happening any time soon.  But I'm not worrying about that right now, I'm happy because I have my pretty box.  

bathroom white gold nate berkus ceramic geo box
 
So back to the pretty box.  It could be a nice discrete spot to hide lady plugs or you know lady stuff, or maybe hair ties and bobby pins, toothbrushes and toothpaste, I mean as long as the stuff is small and shallow the possibilities could be endless.  I did a picture with our toothbrushes and toothpaste to show they fit and it still closes all the way.  I did not leave them in there because that would not work for our two little ones everyday.  It could end up in the office to stash small office supplies or in the master bedroom for my jewelry but for now it is in here looking pretty and making me smile.

bathroom white gold nate berkus ceramic geo box


Our half bathroom has absolutely no natural light and not a single window.  I figured this little, dark bathroom could use some greenery.  I love plants and my goal is to someday have real plants in every single room in our home with the exception of this room.  I wouldn't put a real plant in this small, windowless room for fear of it dying.  So I am very happy that I know this plant wont be dying anytime soon.  I haven't decorated this bathroom because it hardly gets any use, so it's nice to finally add something to it.  It made my wheels start turning, ideas, ideas spinning around in my head.

Threshold Mixed Succulent Potted Arrangement

Threshold Mixed Succulent Potted Arrangement

Threshold Mixed Succulent Potted Arrangement

For almost $16 after tax I bought a few home decor items to freshen up some rooms.  So go ahead, call me a "Clearance Junkie" if you wish, I like my new stuff.  They add personality to our home, I didn't break the bank and they are all very good quality items.  The snails have some weight to them, they don't feel plasticky or cheap.  The ceramic box well, it's ceramic need I say more? and the added storage is a plus.  The plant looks very real and has great texture to it and the base is made of chunky, heavy concrete and looks sooo good.  So overall I am very happy with my purchases even if I didn't find everything I was looking for.

*Disclaimer #2  I wouldn't recommend going on a clearance rampage, you can end up with a lot of unnecessary crap in your house.  Please shop at your own discretion.        


Related Posts Plugin for WordPress, Blogger...