Showing posts with label Before. Show all posts

Mini Bathroom Makeover in the Making


Bathroom paint and knobs

Lately I've been very busy trying to fill up my online shop with new furniture pieces.  Working on furniture takes time, there are lots of steps involved.  Which means my house is being left in the back seat for a long time.  Last week I decided to take a break from painting furniture pieces to give my house a deep clean.  Wow did it need it!  I found our dining table hiding underneath paint cans and painting supplies.  We also had some impromptu house guest (perfect timing, feuf...)  The house is clean, the plants are happy and we were able to eat at the dining table a few times.  I say were because it only lasted that way a few days.  I got the sudden urge to spruce up the bathroom, so all of the bathroom stuff landed on our clean dining room table :-D  A clean dining table is always short lived here.


We can't afford a full reno in the bathroom yet.  It needs it but it is not in our priority list.  We saved up to put in new windows and a privacy fence in the side of the yard and those things were thankfully checked off our list this year.  The windows make such a big difference in our heating and cooling bills so we are very happy with them and they make our curb appeal look much better too.  See pictures here.  So does the fence.  Anyhow enough about that and back to the bathroom.

Before when we bought the house

I wanted to paint the sink cabinet, change out the old sink and faucet with a free one we got off good ole Craigslist .  We have beige fixtures in the bathroom, before we moved in one of the first things we did was to replace the beige toilet with a new water saving, white, elongated toilet.  We also painted the over the dark blue walls with a light, bright color called Irish mist.  The drop in sink and bathtub are still beige.  We are not switching the bathtub for now, that will be later with the full reno.  I also wanted to paint the doors, trim and finish the walls which we never did because they needed patching.  Simple right?
** Update- Free sink and faucet from Craigslist didn't work we had to purchase both pieces new!!!**

Before when we bought the house

New elongated, water, saving toilet (notice the green heater)

No, things are never as simple as I think they will be.  I started prepping the sink cabinet for paint and I called my husband and pointed out the fact that the baseboard heater is green and rusted.  I thought about painting it, but it would be messy.  I had to sand off the rust, prime with stop rust primer and then paint.  He said we should switch the cover out. I looked online and found some plastic covers you place on top but the reviews didn't convince me.  Plus the thought of putting something over them to hide the ugly doesn't help me because I know the ugly, rusted, dirty one is still under, and I wouldn't be able to sleep at night just thinking about it.  So we decided to just replace it with a new one.  The video on this old house made it look sooooo easy.  Long story short it wasn't as easy as we thought it would be but after much sweat,  a lot of cursing, fallen tiles and a few hours (yes hours) we got it done!

Before, nasty, green, rusted heater
Replace baseboard heater cover
After, pain the @$$ to install clean, new heater!
Replace baseboard heater cover
Full view!

We do not want to replace the tiles right now so we were lucky only one broke a little bit in the corner so I will be gluing them all back for now until we can afford a full renovation.  Replacing the heater set us back a day.  Next we wanted to replace the sink.  Well, it looks like that faucet has never once been shut off in it's entire life and the water shut off valve is stuck.  So back to home depot for more supplies.  New hoses, new shut off valves and drain pipe.  We got home, and realized we bought the wrong hoses, it was too late so we have to wait until later today to exchange them.

So in the middle of all this chaos, I decided it would be a good time to paint the ceiling, because you know all the other accumulated projects on the list wast enough.  Hubby took off the ugly light fixture so I could begin and it turns out we didn't have any rollers, like I though we did.  So nothing else got done.  Turns out we were very unprepared.  So I'm making a list, checking it twice (in my Santa Claus is coming to town singing voice).

So here we go....

List of things to buy
  • Rollers
  • Exchange hoses 
  • Paint trays
  • Liquid nails for the tiles
  • Toothpaste for brushing teeth :-D  
To do list
  • Sand cabinet doors and drawer fronts
  • Clean, de-dust, everything
  • Prime ceiling, caulk trim and piece of unfinished wall (I already patched it) then prime them
  • Prime cabinets and doors.  
  • Replace drop in sink and faucet
  • Glue fallen tiles and caulk between them and the heater.
  • Paint the cabinet in gorgeous green color, I'm so excited about adding color!!!!
  • Make holes for new cabinet hardware, I bought some really nice ones, I can't wait for that!
  • Shop for pretty shower curtain, and figure out window treatment.
  • Clean up the old light fixtures and vintage mirror, keeping those for now.  


It looks like we have our work cut out for us.  Now of to Home Depot.

Yes this post is full of ugly pictures but I'm hoping my next post will be full of gorgeous, after pictures!  So make sure to come back for the reveal!

If you want to see a mini, budget friendly, kitchen makeover see this post here!        


Front Door Makeover With Modern Masters


I finally gave my front door a makeover with Modern Masters Front Door Paint.  I should probably warn you that this post is before and after picture heavy.  This project has been a long time coming.  We've been wanting to up the curb appeal of our home since day one and we have slowly been working on it.  When I say slowly, I mean turtle speed slow.  Last year we replanted some shrubs, added a little pine tree in the front, switched out the red mulch for brown mulch and called it a day.  This year we replaced all the windows, happy dance!

Front door makeover Lilly's Home Designs Modern Masters Black Elegant
Actual 1st Before picture.  Note all the horrible dry trees and overgrown ugly shrubs
Front door makeover Lilly's Home Designs Modern Masters Black Elegant
After we removed the uglies, transplanted the pretties, re-mulched and planted a pine tree.

Front door makeover Lilly's Home Designs Modern Masters Black Elegant
Much better, if I do say so myself!
Front door makeover Lilly's Home Designs Modern Masters Black Elegant
Pretty mulch, cute shrubs, good enough to hold us off for a year!
Front door makeover Lilly's Home Designs Modern Masters Black Elegant
One year later, after adding new windows!
Front door makeover Lilly's Home Designs Modern Masters Black Elegant
NOW!
A little over a month ago, just as spring was ringing in (perfect timing), I was contacted by Modern Masters to see if I wanted to try out some of their paint products.  When I saw that they offered Never Fades Front Door paint I knew this would be a great opportunity to spruce up our front doors.  Painting the doors also gave us the push we needed to tackle some other outdoor projects that we hadn't gotten around to.

Front door makeover Lilly's Home Designs Modern Masters Black Elegant

Our house has two front door entrances which is kinda weird and one was painted blue and the other one was left untouched in its' original pre-primed state.

Front door makeover Lilly's Home Designs Modern Masters Black Elegant
Before Door Number 1

Front door makeover Lilly's Home Designs Modern Masters Black Elegant
Before Door Number 2

To get started on this project, I cleaned the doors with TSP, the blue door got a light sanding beforehand.  I bought a quart of Zinsser Bulls Eye and had it tinted grey for the white door.  The blue door did not need to be primed so I just went ahead and started painting it.

Front door makeover Lilly's Home Designs Modern Masters Black Elegant
One coat of grey primer, and edging the window of the door with paint
Front door makeover Lilly's Home Designs Modern Masters Black Elegant
After 1st coat of paint on primed door
Front door makeover Lilly's Home Designs Modern Masters Black Elegant
After 1st coat of paint on blue door

We chose the color "Elegant" which is a rich, black shade.  I shook the can really well and used a stirring stick to mix all the ingredients well.  The first thing I noticed upon opening the can of Front Door Paint was that the consistency of the paint was really thick.  I used a 2 inch angled brush and a 4 inch foam roller to apply the paint.  The paint went on smooth, and dried quickly.  One of my favorite things about this paint is that I was able to re-coat the doors after only one hour.  Which meant that I could finish this project in just a few hours and the doors were fully dry and ready to close within a couple of hours of finishing painting.

Front door makeover Lilly's Home Designs Modern Masters Black Elegant

Front door makeover Lilly's Home Designs Modern Masters Black Elegant

 My doors required 3 coats of paint for complete coverage.  I did end up applying a fourth coat of paint, only because I didn't stir the paint before the third coat so the sheen was uneven.

***Tip, always stir your paint while painting and between coats so that you get a nice uniform color and sheen***

Front door makeover Lilly's Home Designs Modern Masters Black Elegant
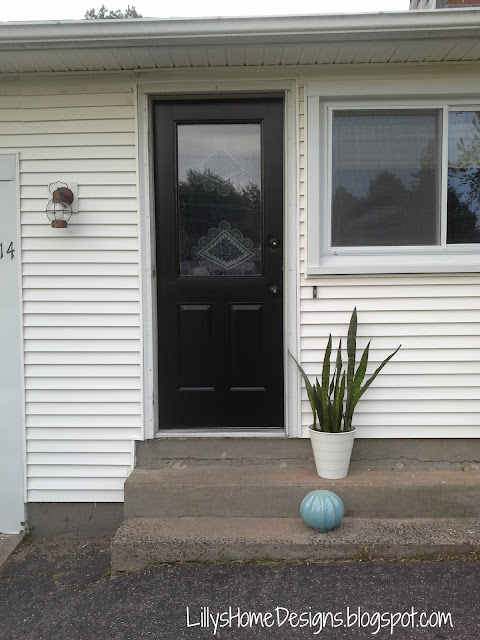
After door number 1
Front door makeover Lilly's Home Designs Modern Masters Black Elegant
After door number 2
Here is their How To Paint Your Front Door video!


If you prefer the reading version here is a link to the Step by Step Instructions.  Their website also has an app that you can download to help you pick out the perfect paint color for your front door and lots of other helpful information.  You can purchase the paint through their online store at shop.modernmasters.com, at Home Depot online store, Amazon or check their website under find a retailer.

Front door makeover Lilly's Home Designs Modern Masters Black Elegant

When I was done painting the doors I knew it was time to finally switch out our old house numbers and mailbox.  We had purchased them months ago but just never got around to it.  The old mailbox was very rusted and small.  We updated our house numbers with some sleek, simple ones and a DIY project that I will share a how to on later.

Front door makeover Lilly's Home Designs Modern Masters Black Elegant

Front door makeover Lilly's Home Designs Modern Masters Black Elegant

We also changed the light fixtures by the garage.  I bought those over a year ago because I found them on clearance but never really got around to changing them until now.  Now that we have an idea of how we want the front of our house to look we are going to change the color of the light fixtures to match the one we will be getting for the other door.

Front door makeover Lilly's Home Designs Modern Masters Black Elegant

We wanted to paint the garage door in the same color as the doors but I didn't think I had enough paint left.  I really think that it will tie things up pretty nicely.  So that is a project we will be doing in the future, along with some other ideas we have to spruce up the curb appeal.

Front door makeover Lilly's Home Designs Modern Masters Black Elegant
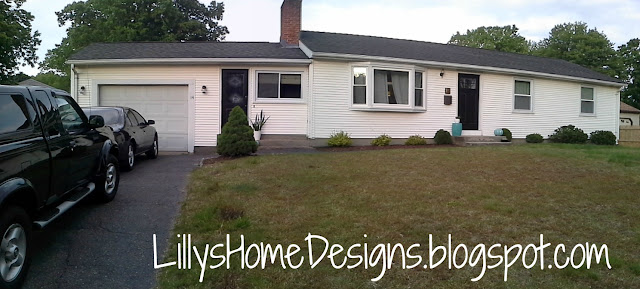
Panoramic view of the front of the house
Front door makeover Lilly's Home Designs Modern Masters Black Elegant


This Front Door Makeover with Modern Masters really kicked up the curb appeal of our home a notch and gave us the motivation we needed to kick start on some other outdoor projects.  We have since done a few other improvements that I will be sharing soon!  We are so pleased with how the curb appeal of our house is looking!  Even a couple of our neighbors stopped by to say the house was looking gorgeous!  This really was a perfect Memorial Day weekend project!  Did anyone else work on improving the curb appeal or some other fun outdoor projects on this beautiful Memorial Day weekend?

Memorial Day Lilly's Home Designs

***Thanks to Modern Masters for providing me with the Front Door paint, so that I could share my completely honest review with my readers.  All thoughts and opinions stated in this post are 100% truthful and my own***

     Linking up to


Lightening Up The Kitchen


When we bought our new house we inherited a  fugly kitchen.  From day one I started thinking of some inexpensive, quick fixes we could do to make it more our style until we could afford a major remodel.

Black white tuxedo kitchen painted faux brick

The kitchen walls were painted a dark blue, and the cabinets are white on top and black on the bottom.  They are painted in flat finish and they were not primed, you know what that means, right?  When you try to clean them the paint comes off and all the dirt, oil and wine splatters are absorbed into the flat finish, leaving dingy splotches everywhere.  Even the ceiling is painted in flat white and it has wine splatters on it.  I know what you are thinking, how on earth does one get wine up on the ceiling?  It's irrelevant!

white black tuxedo kitchen painted faux brick
Before
 The appliances were beige and the fridge had "faux" wooden door handle. The kitchen also came with a "fabulous" faux brick back splash and an even more "fabulous" faux butcher block counter top, It's "fauxbulicious"!  I can go on and on about the negatives but let's just focus on the things that have improved since we've moved in.

Before

The first thing we tackled was to paint the walls in Behr's Irish Mist.  I had the paint matched to Glidden's premium paint and primer to save money and I used semi gloss finish to make it easy to wipe clean.  Then we replaced the appliances with our own stainless steel appliances.  We haven't changed the dishwasher yet because I have never used a dishwasher in my life, so I have no idea if I even want a new one or just add storage in it's place.

white black tuxedo kitchen painted faux brick


 We also switched out the overhead light fixture for this Allen + Roth ORB flushmount from Lowes.  It looks ten times better than the small, white, boob light that was there before.

Allen Roth Oil rubbed bronze flush mount light fixture lowes

Next up, I changed the white vinyl mini blinds for a nice, textured, woven shade from Home depot.  It looks like they don't carry the same ones anymore the closet match I could find was this one, Radiance Cocoa Havana bamboo roman shade.

white black tuxedo kitchen
With white vinyl mini blind

marbled hanging pendant woven shades
The nice, woven, textured shades

Lastly I painted the faux brick in the same paint as the walls.  Now the kitchen feels lighter and brighter and I don't hate the brick as much as I used to.

Black white tuxedo kitchen painted faux brick

Black white tuxedo kitchen painted faux brick

Below are some of the other things we would like to do to the kitchen in this for now phase

  • Prime and paint the trim and ceiling semi gloss white.
  • Sand and repaint the cabinets, the paint job was done very poorly.
  • Change out the hardware on the cabinets.
  • Replace the hanging light fixture over the sink with something more our style.
  • Do something about the wasted space over the refrigerator.

There are a lot of other little improvements we are letting simmer before we make any decisions because we don't want to spend a lot of money on temporary fixes.  The short list above will help us get by until we save up for a major overhaul.  Sometimes taking your time before doing any extreme changes is better in the end.  This way we can get a feel for how we use the space, what works, what doesn't and what can use some improvements.  The kitchen already feels so much better with just the simple, quick fixes we've done so far.

Linking up to

Dreaming Up The Master Bedroom


rustic headboad bed frame wall lamp mid century dresser gold mirror campaign chest

We are dreaming up a cozy, comfy, minimalist, master bedroom to retreat to at the end of the night. Our new master bedroom is not huge but it is the biggest bedroom we have ever had.  It has a couple of good aspects about it as well as some bad ones too.  We also have a lot of key pieces that we need and love but it's not put together in a way that reflects our style.  I have pinned lots and lots of bedroom ideas in hopes that some day I can transition them into our bedroom.

  The master bedroom in our last home was about 11' x 12'.  We made very good use of every inch of space we had.   Below are some pictures of our old bedroom.

Rustic headboard nightstand teal white Moroccan rug

Rustic headboard nightstand teal white ikea mirror vanity

teal white stain mid century modern dresser

Rustic headboard nightstand teal

I made a pros and cons list of our new bedroom.

Pros
  • Three ample closets = lots of storage. 
  • Three medium sized windows = natural light.
  • A half bathroom. 
  • Bigger size than what we've had before.
Cons
  • Too many doorways and windows leaving us with limited options for furniture placement.
  • No overhead lighting.   
  • The only room in the house that is carpeted, I prefer hardwood. 
  • No bathtub or shower in the bathroom.
  • The whole room including walls and trim were once painted in oil base paint, of course I noticed after we painted, now we have peeling paint. 
  • We still have a lot of trim to paint with all those doors and windows.
  • All the doors are mismatched louvered doors too, I really don't like them.

louvered doors

The good thing is most of the cons are cosmetic things we can change.  The limited options for furniture placement isn't such a big deal.  I like the wall where the headboard is right now and that's our biggest piece of furniture.  What makes up for it is that in return we have lots of storage.  I try to look at the bright side of things.  We don't have overhead lighting but I get to have lots of lamps, I love lamps.  Sure it's a carpeted room but at least the rug is new, plush and a neutral color that we can work with.  The bathroom doesn't have a shower but we only had one bathroom in our last place so it's a treat to have a second bathroom.  So the room definitely has some things going for it.  I'm really happy that we have more space and storage.  

rustic headboad bedframe wall lamp mid century dresser

As for the pieces that we love and want to keep, number one would be our headboard and bed frame combination. We designed and built that beast with our own two hands.  It weighs a ton but it's definitely our favorite piece in the room, that stays!  
*The papers on the wall are pictures that my daughter makes for me and tapes them on the wall for me, she's so sweet.

Master bedroom campaign chest rustic headboad bedframe

Next up is my dresser, its a Mid-century piece that I refinished a couple years ago.  It is very well built and that is my favorite thing about it.  The six drawers give us lots of more storage for smaller clothing pieces.  I might try moving it over to the other wall across from where it is because I have a matching tall dresser that I want to redo for my hubby and I think it would look better on this wall.  So we will see how that works out later on.

mid century modern dresser stain white paint gold mirror

The wall lamps flanking the headboard are new, we bought them for this room and we love them.  I like that they don't take up any surface space from our nightstands.

Master bedroom, wall lamp, rustic headboard

Master bedroom, wall lamp, rustic headboard

The nightstands are standby pieces until we build or buy new ones.  The one on my husbands side was built completely out of scrap pieces of wood we had laying around.   My side has a campaign one that I found on craigslist.  But like I said they are temporary solutions.

Master bedroom wall lamp rustic headboard nightstand

Master bedroom, Campaign nightstand wall lamp

The trunk at the foot of the bed, I would love to keep but I'm not sure because... Once upon a time we had a nice leather bench at the foot of the bed that was always covered in clean laundry and bed covers so I got rid of it.  Now it lives with my sister and brother in law and is covered in their bed linens and laundry (ha, ha, ha, ha...evil laugh). The End!

Master bedroom campaign chest

 I love looking at my Master Bedroom Pinterest board it makes me smile but when I look at our actual bedroom it makes me yawn (pun intended).  A couple of things that I noticed from my pins are...
  • The spaces are minimal, there's not lots of furniture pieces or bedding.
  • They look cozy because of all the layered textures and materials.
  • Most of them have white walls with mostly neutral colors as accents.
  • Greenery, plants.
In order to incorporate some of these aspects, I will start by only keeping the furniture pieces that I need.  This is harder for me than most people because I love furniture, it's what I do, I redesign furniture.  I do want some different nightstands though, I was thinking maybe some floating ones.  Keeping bedding to a minimum is easy, I feel like I have that down packed.  I hate extra fluff on the bed because I don't like making the bed, so if there's a lot of stuff that needs to be put back on the bed, chances are I wont be making the bed (I hope my mom isn't reading this post!). 

For coziness, I can switch out the pillow shams for something with a bit more pattern or texture and maybe add one long throw pillow in the middle.  Our blanket might not be the prettiest but its warm and cozy for us and the colors are neutral so that stays until we can afford one something of better quality.  Some window treatment will help warm up the space too but I'm still not sure if I want to go with my usual woven shades plus drapes combo or something more simple like fabric roman shades.  We also need to add some wall art.

We already painted the room when we first moved in, the color is nice light and I have yet to paint all the trim in white so that should lighten up the room a bit more.  I also want to paint all the the doors black.

Adding a couple plants in here will bring in some color and another element of nature, while still keeping everything pretty neutral.  I've said before that my goal is to one day have plants in every single room of the house.  So far the only rooms that don't have any plants are the bedrooms and they really should,  since plants are good for cleaning air pollutants.

So it looks like I have my work cut out for me.  I can't wait to see all of these ideas come together so that we can have a cozy, comfortable, uncluttered space to relax in at night.

Related Posts Plugin for WordPress, Blogger...