Lately I've been very busy trying to fill up
my online shop with new furniture pieces. Working on furniture takes time, there are lots of steps involved. Which means my house is being left in the back seat for a long time. Last week I decided to take a break from painting furniture pieces to give my house a deep clean. Wow did it need it! I found our dining table hiding underneath paint cans and painting supplies. We also had some impromptu house guest (perfect timing, feuf...) The house is clean, the plants are happy and we were able to eat at the dining table a few times. I say were because it only lasted that way a few days. I got the sudden urge to spruce up the bathroom, so all of the bathroom stuff landed on our clean dining room table :-D A clean dining table is always short lived here.

We can't afford a full reno in the bathroom yet. It needs it but it is not in our priority list. We saved up to put in new windows and a privacy fence in the side of the yard and those things were thankfully checked off our list this year. The windows make such a big difference in our heating and cooling bills so we are very happy with them and they make our curb appeal look much better too.
See pictures here. So does the fence. Anyhow enough about that and back to the bathroom.
 |
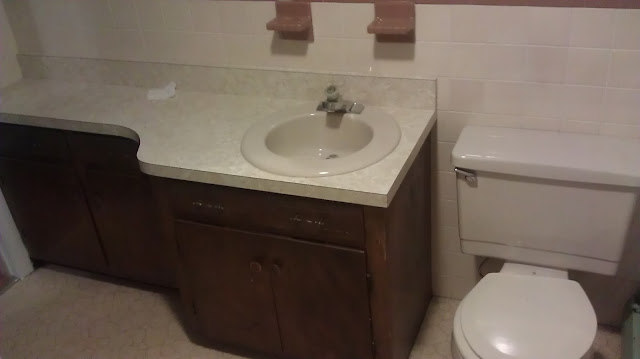
| Before when we bought the house |
I wanted to paint the sink cabinet, change out the old sink and faucet
with a free one we got off good ole Craigslist . We have beige fixtures in the bathroom, before we moved in one of the first things we did was to replace the beige toilet with a new water saving, white, elongated toilet. We also painted the over the dark blue walls with a light, bright color called Irish mist. The drop in sink and bathtub are still beige. We are not switching the bathtub for now, that will be later with the full reno. I also wanted to paint the doors, trim and finish the walls which we never did because they needed patching. Simple right?
** Update- Free sink and faucet from Craigslist didn't work we had to purchase both pieces new!!!**
 |
| Before when we bought the house |
 |
| New elongated, water, saving toilet (notice the green heater) |
No, things are never as simple as I think they will be. I started prepping the sink cabinet for paint and I called my husband and pointed out the fact that the baseboard heater is green and rusted. I thought about painting it, but it would be messy. I had to sand off the rust, prime with stop rust primer and then paint. He said we should switch the cover out. I looked online and found some plastic covers you place on top but the reviews didn't convince me. Plus the thought of putting something over them to hide the ugly doesn't help me because I know the ugly, rusted, dirty one is still under, and I wouldn't be able to sleep at night just thinking about it. So we decided to just replace it with a new one. The video on this old house made it look sooooo easy. Long story short it wasn't as easy as we thought it would be but after much sweat, a lot of cursing, fallen tiles and a few hours (yes hours) we got it done!
 |
| Before, nasty, green, rusted heater |
 |
| After, pain the @$$ to install clean, new heater! |
 |
| Full view! |
We do not want to replace the tiles right now so we were lucky only one broke a little bit in the corner so I will be gluing them all back for now until we can afford a full renovation. Replacing the heater set us back a day. Next we wanted to replace the sink. Well, it looks like that faucet has never once been shut off in it's entire life and the water shut off valve is stuck. So back to home depot for more supplies. New hoses, new shut off valves and drain pipe. We got home, and realized we bought the wrong hoses, it was too late so we have to wait until later today to exchange them.
So in the middle of all this chaos, I decided it would be a good time to paint the ceiling, because you know all the other accumulated projects on the list wast enough. Hubby took off the ugly light fixture so I could begin and it turns out we didn't have any rollers, like I though we did. So nothing else got done. Turns out we were very unprepared. So I'm making a list, checking it twice (in my Santa Claus is coming to town singing voice).
So here we go....
List of things to buy
- Rollers
- Exchange hoses
- Paint trays
- Liquid nails for the tiles
- Toothpaste for brushing teeth :-D
To do list
- Sand cabinet doors and drawer fronts
- Clean, de-dust, everything
- Prime ceiling, caulk trim and piece of unfinished wall (I already patched it) then prime them
- Prime cabinets and doors.
- Replace drop in sink and faucet
- Glue fallen tiles and caulk between them and the heater.
- Paint the cabinet in gorgeous green color, I'm so excited about adding color!!!!
- Make holes for new cabinet hardware, I bought some really nice ones, I can't wait for that!
- Shop for pretty shower curtain, and figure out window treatment.
- Clean up the old light fixtures and vintage mirror, keeping those for now.
It looks like we have our work cut out for us. Now of to Home Depot.
Yes this post is full of ugly pictures but I'm hoping my next post will be full of gorgeous, after pictures! So make sure to come back for the reveal!
If you want to see a mini, budget friendly,
kitchen makeover see this post here!