Showing posts with label furniture. Show all posts

Rustic Grey White and Black Painted Desk

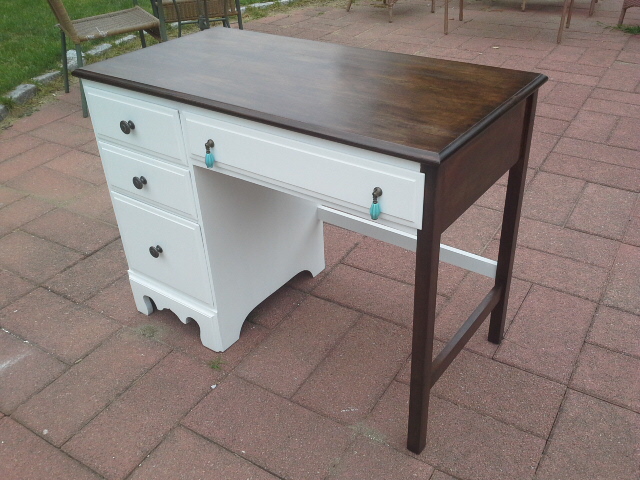
When I got this desk I wasn't sure how I was going to paint it.  I new I wanted to stick to neutrals and I wanted to do more than one color.  I wanted to keep the hardware because I they go very well and I love the noise it makes when you grab it and let go of it, I know it's a weird thing to like but just I can't explain it.  By the way if you are wondering about the coffee table you can see how I painted it in ombre effect here.

Rustic Grey White and Black Painted Desk

And here is the desk in it's new painted glory.  I sanded it and painted it grey with thick black and white stripes over the bottom drawers.  I then sanded a whole lot to give it a rustic farmhouse look.  I used several coats of poly and reattached the original hardware.  

Rustic Grey White and Black Painted Desk

Rustic Grey White and Black Painted Desk

Rustic Grey White and Black Painted Desk

Rustic Grey White and Black Painted Desk

The inside of the drawers got some modern contact paper.  I love doing a little something in the inside, I know a lot of people don't see it but it's a little happy moment when you open the drawer and see a little something fun in the inside.  

Rustic Grey White and Black Painted Desk

 I usually like doing a little staging pre-pictures but the process of prepping, painting, pictures, posting is so long that sometimes it's just easier to do away with the staging part.  Maybe the next piece!  Anyhow, this piece is available in my Etsy shop.


http://lillyshomedesigns.blogspot.com/2016/07/traditional-modern-bohemian-desk.html


Lucky Green Nightstand Set


A little while ago I painted a nightstand set in Sherwin Williams Lucky Green.  It was a long process like always but the end result was fabulous and they sold right away.

Green Nightstand set

Green Nightstand set

They came with big ornate hardware but I new I wanted to change them and give this set a modern look.  I chose the green color and used Sherwin Williams advance paint in high gloss.  I bought some gorgeous lucite and chrome hardware, two pulls for the bottom drawers and two round knobs for the top.

Green Nightstand set


Green Nightstand set

Green Nightstand set

The set got filled sanded primed twice sanded again and I sprayed 5 ultra thin coats sanding between each one to achieve a smooth finish.  I had some over spray on the drawers so I painted the sides in the same color and added a modern black and white contact paper to the inside of the drawers.

Green Nightstand set

Green Nightstand set

I posted  them up for sale on my Etsy shop and they sold very quickly.  I was flattered when an interior designer contacted me because she wanted the set for her client who's home she was designing.  Her client purchased them and we delivered the set that same weekend to a gorgeous brownstone in a trendy area of Boston Massachusetts.

Green Nightstand set

Green Nightstand set

Green Nightstand set

Some people gave me a crazed look when they saw the color I had chosen but I knew this was the right look for them.  My customers where so happy and so was their interior designer who was there to see them at the time of the delivery.  They loved them and I couldn't be happier!  I guess the color I chose for the nightstand set really was a lucky green after all ;-)


Ombre Painted Coffee Table


Ombre painted oval coffee table

Let me just start by saying, I love painting furniture!  I do, I think about furniture all day, it's always in the back of my head no matter what I'm doing.  I do a ton of work on my pieces and I do it with love.  But lately the more I paint and the more I look for inspiration out there I feel overwhelmed.  I want to be unique and give my pieces a little twist here and there, like I did on this desk.  But it doesn't feel like enough.  Its easy to fall into trends or play it safe so that it will appeal to more people.

Ombre painted oval coffee table

I had been staring at this coffee table (sorry it's not a great before picture) for a little while and everyday I kept thinking I want to paint a blue ombre effect from the center of the coffee table out.  I've never done ombre before but I wanted to try.  So I did a little inspiration shopping on Pinterest and I came across Dionne at The Turquoise Iris, she is a truly brave, talented, amazing artist!  She puts her soul into her furniture makeovers.  She is not painting furniture, she is painting ON furniture, the furniture is her canvas.  This makeover was definitely inspired by her.

Ombre painted oval coffee table

I woke up early one day and said today is the day, I'm going to let my hands do all the painting.  I'm not thinking, I'm just breathing and letting my hands move the brushes, blending the colors, letting the paint be free.  The way the paint colors blended and the drips... oh my, the drips, they are my favorite part.  At first I tried to fix them because you know, furniture drips are a no no, but I loved the way the drips mended themselves onto the other colors and I decided to just let them happen.

Ombre painted oval coffee table

Ombre painted oval coffee table

Ombre painted oval coffee table

Ombre painted oval coffee table

I know this ombre painted coffee table is not for everyone but I love it and I enjoyed every minute of creating it!  I think from time to time, you need to let your imagination run wild and be free.  Forget about the rules, just go with the flow.  

Linking up to

Curbside Cabinet Makeover


Curbside Cabinet Makeover

A few weeks ago I shared pictures on Facebook and Instagram of a curbside cabinet that I brought home to give it a makeover.  This cabinet had lots of dirt, cat hair and cat scratches.  It was pretty gross but nothing a little, no who am I kidding, a lot of elbow couldn't fix.

Curbside Cabinet Makeover

I started by vacuuming the cabinet inside and out.  Then I wiped it down, it was filthy I used up all my Clorox wipes.  I also cleaned it with TSP.  Next I removed all the hardware and the kick-plate.  I filled all the holes and cat scratches with wood filler.  Then I sanded the top off to bare wood and lightly sanded the body and areas where I had applied the wood filler.

curbside cabinet makeover

Curbside Cabinet Makeover

I made the new holes for the new hardware and got a piece of wood cut to size for the new bottom kick-plate.  There was nothing wrong with the kick-plate it came with. Its just that this cabinet really wanted to be a boy cabinet so it needed a straight bottom.  The other kick-plate looked like a girly skirt on it.  I also bought a pack of wooden buttons, because it was missing a few and I needed to cover the screw holes on the new kick plate.  I painted the cabinet a rich medium grey and stained the top and sealed it with multiple coats of polycrylic.

Curbside Cabinet Makeover

Curbside Cabinet Makeover

Curbside Cabinet Makeover

The back cover panel had holes in it so I bought a new one and attached it with screws.  I painted the inside of the back panel in the same grey as the body and sealed it.  I left a piece of wood in the middle exposed and the sides because I like the way the wood tone looks with the grey.  I also lined the drawer with a fun mustache fabric using Modge Podge and sealed it with Polycrylic too. 

Curbside Cabinet Makeover

Curbside Cabinet Makeover

Curbside Cabinet Makeover

Curbside Cabinet Makeover

Now there's no mistaking this cabinet for a girl, it's definitely a boy cabinet. No more tiny little ceramic knobs or frilly skirt.  Now its got chunky hardware, mustache fabric, straighter lines, and two tone stain with masculine grey paint.

Curbside Cabinet Makeover

Curbside Cabinet Makeover

 I brought it in to the kitchen for a little staging fun, because that's just the way I am, I like staging pieces.  I actually had to take down my recycling bins from the wall to take these pictures.

Curbside Cabinet Makeover

Curbside Cabinet Makeover

Curbside Cabinet Makeover

 If only the person who left this by this cabinet by the curbside could see this makeover!  Can you believe I found this cabinet on the same street, the house right next door to where I found this Roadside Side Table that I gave a makeover to months ago?


Charcoal Grey Mahogany Sideboard


Charcoal Grey Vintage Mahogany Sideboard

On a shopping trip to Goodwill, I spotted this vintage mahogany sideboard and snatched it up right away.  It took me about a week or so to get started working on it because I couldn't decide on a color for it.  My head was sniping all over the place, so I looked for inspiration in Pinterest and that made it worse because then I had a ballillion choices.  I finally had a vision in my head of how I wanted the piece to look.  My gut was telling me to paint it in a dark charcoal grey with the middle section in a light grey and stain the top.

Charcoal Grey Vintage Mahogany Sideboard

Charcoal Grey Vintage Mahogany Sideboard

I started by sanding the top finish off completely working my way from coarse, to medium, to fine grit sand paper for a smooth finish.  I gave the body a light sanding with fine grit too.  Then I filled some spots where the veneer was missing.  Rustoleum's Kona gave the top a nice, even tone.  I mixed my own chalk paint for this piece.   After a few coats of each color, I let the paint dry over night and came back the next day and sanded the whole piece to remove any bumps and lightly distress the edges.  I sealed the bottom portion with Minwax polycrylic in satin and the top in gloss finish.

Charcoal Grey Vintage Mahogany Sideboard

I liked the original hardware but I wanted to remove the years of tarnish, to give them a fresher look.  I used Bar Keepers Friend, it was working quite well.  They were a nice brassy color underneath, unfortunately two of the hardware pieces had a silver tone to them.  I needed another solution so I thought about using Rub and Buff.  I've never used it before but read good things about it.  I went to two different craft stores near by and neither of them carried it.  One of them had a similar product called Metallic Luster.  I bought it, took it home and tried it out but it was a bust.  It didn't work for me, it was too much of a bright gold and the finish was translucent.  Maybe I didn't do it right, I don't know.  Anyhow I finally found Rub and Buff at Hobby Lobby and it worked like a charm.
     
Charcoal Grey Vintage Mahogany Sideboard
Charcoal Grey Vintage Mahogany Sideboard rubb and buff hardware

The decorative trim from the top back was missing so I picked up a piece of 1x2 at Home Depot.  My hubby cut it for me and then I screwed it in from the back, stained it and sealed it.   I also added some wooden corner pieces as supports to give it more stability since it is such a top heavy piece.

Charcoal Grey Vintage Mahogany Sideboard

Charcoal Grey Vintage Mahogany Sideboard

I am totally in love with how this Charcoal Grey mahogany Sideboard came out.  I wish I had a bigger house so that I could keep it!  I say that a lot but it's not true, I actually love that our house is not so big, it's perfect for us.  I guess what I mean is, I wish I needed it or had a spot for it at home, but I don't so hopefully this vintage beauty finds a perfect home soon.

Charcoal Grey Vintage Mahogany Sideboard

Charcoal Grey Vintage Mahogany Sideboard

Charcoal Grey Vintage Mahogany Sideboard

Charcoal Grey Vintage Mahogany Sideboard

Charcoal Grey Vintage Mahogany Sideboard


Charcoal Grey Vintage Mahogany Sideboard

Charcoal Grey Vintage Mahogany Sideboard


Charcoal Grey Vintage Mahogany Sideboard

Linking up to

Related Posts Plugin for WordPress, Blogger...